Infrastructure as Code (Terraform)
Our generator provides professional-grade infrastructure templates using Terraform, supporting AWS, Google Cloud (GCP), and Microsoft Azure. We follow Well-Architected Framework principles across all providers to ensure security, reliability, and cost-efficiency.
The mindset and architecture topology for deploying across all three cloud providers are identical. Only the underlying native resources (e.g., EC2 vs Compute Engine vs Virtual Machines) differ.
Infrastructure Tiers
You can choose between two tiers depending on your project needs and budget.
| Feature | Standard (Cost-Efficient) | Production (High Availability) |
|---|---|---|
| Target Use Case | Dev, Staging, MVP | Production, High-Traffic Apps |
| WAF (Firewall) | ❌ Disabled (Save cost) | ✅ Enabled (SQLi, XSS Protection) |
| Database | Single Instance | High Availability (Automatic Failover) |
| Compute | 1 Instance / VM | Multiple Instances / VMSS |
| Network (NAT) | 1 NAT Gateway | 1 NAT Gateway |
Visual Architecture
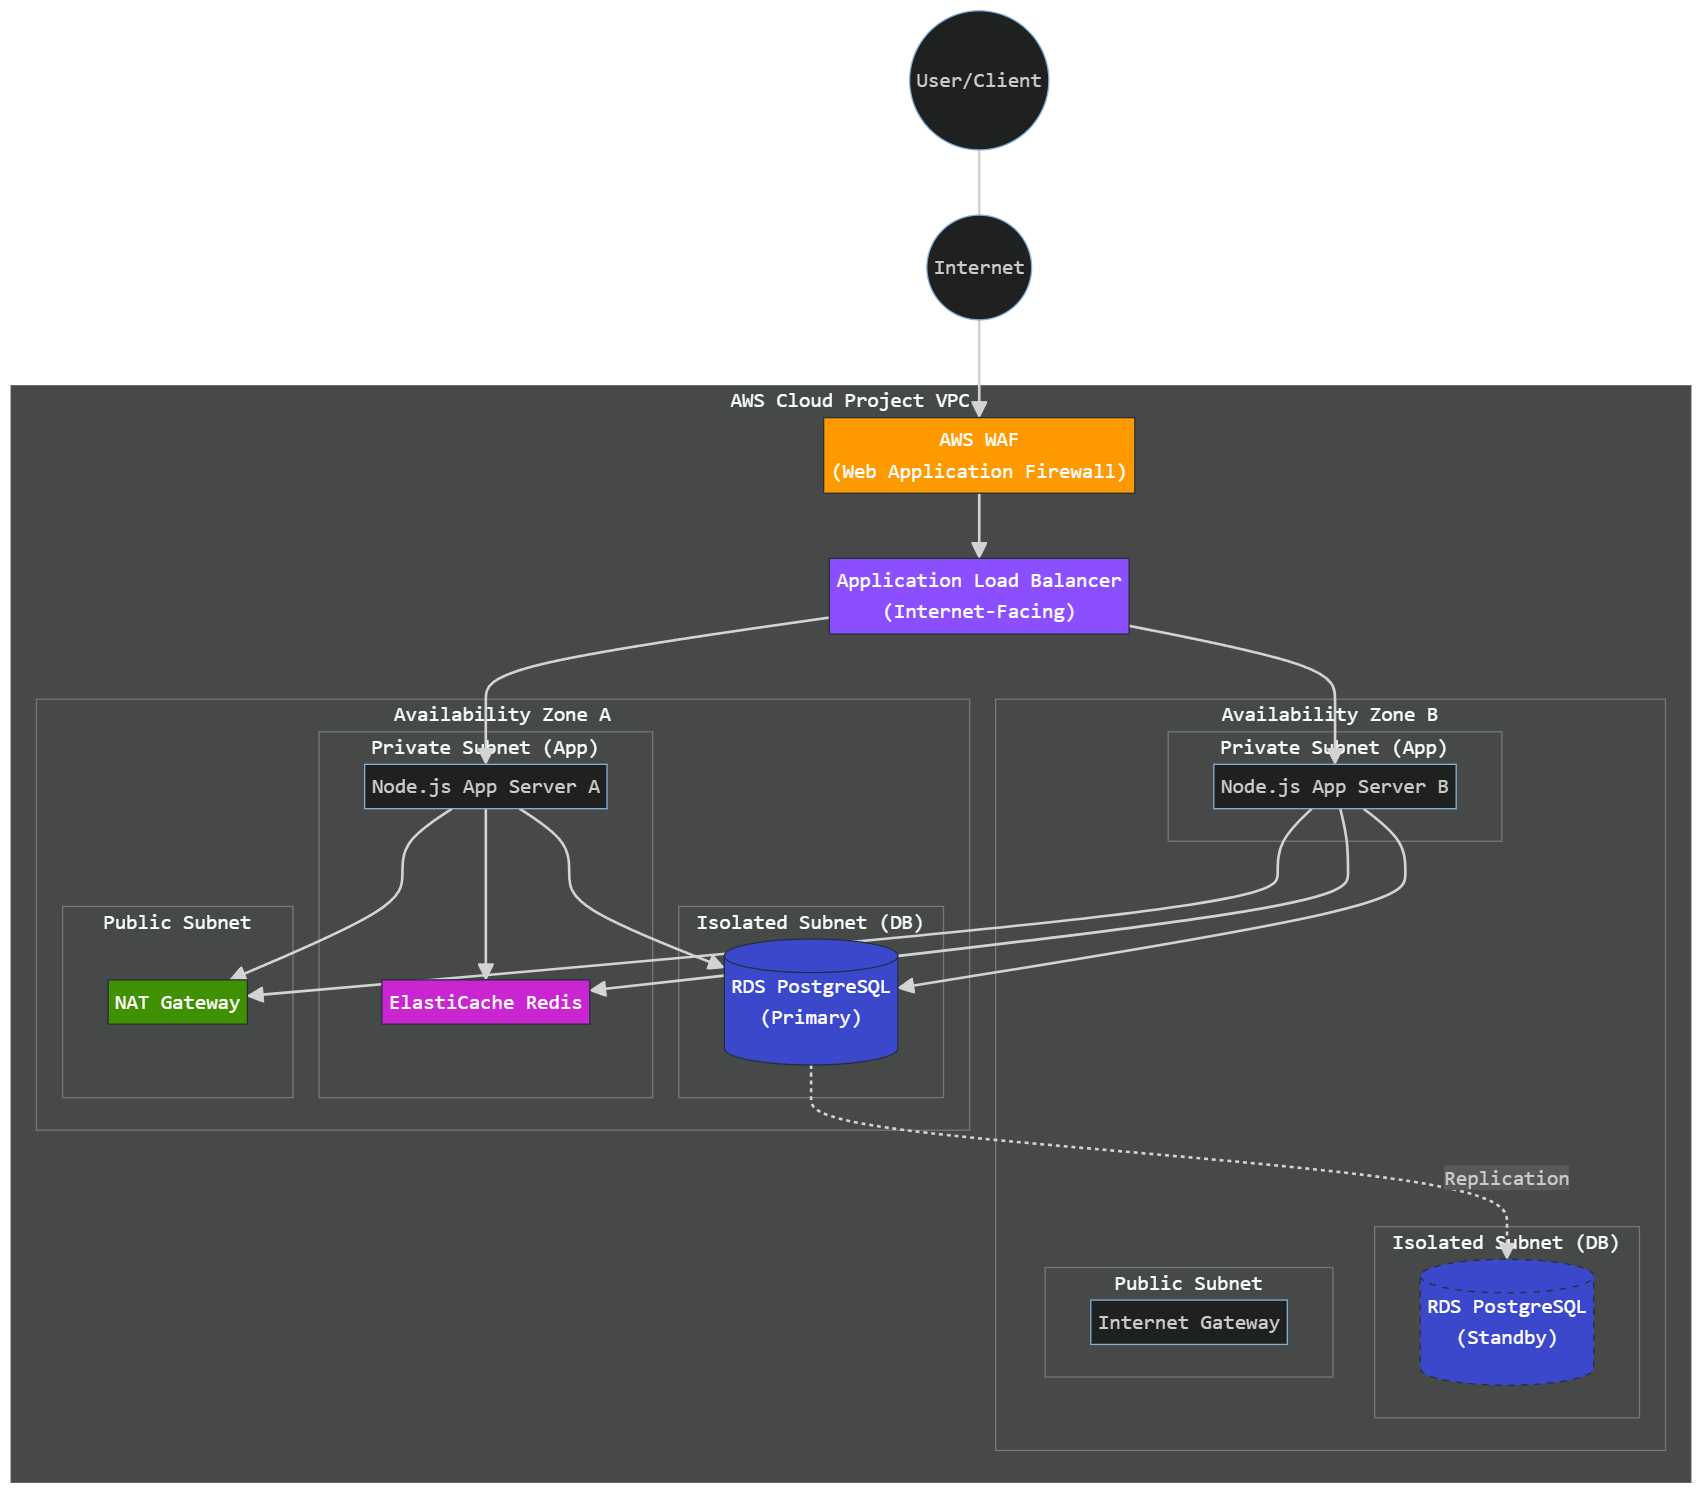
Production Tier (High Availability)
This architecture is designed for zero-downtime and maximum security, distributing application and database resources across multiple isolated zones.
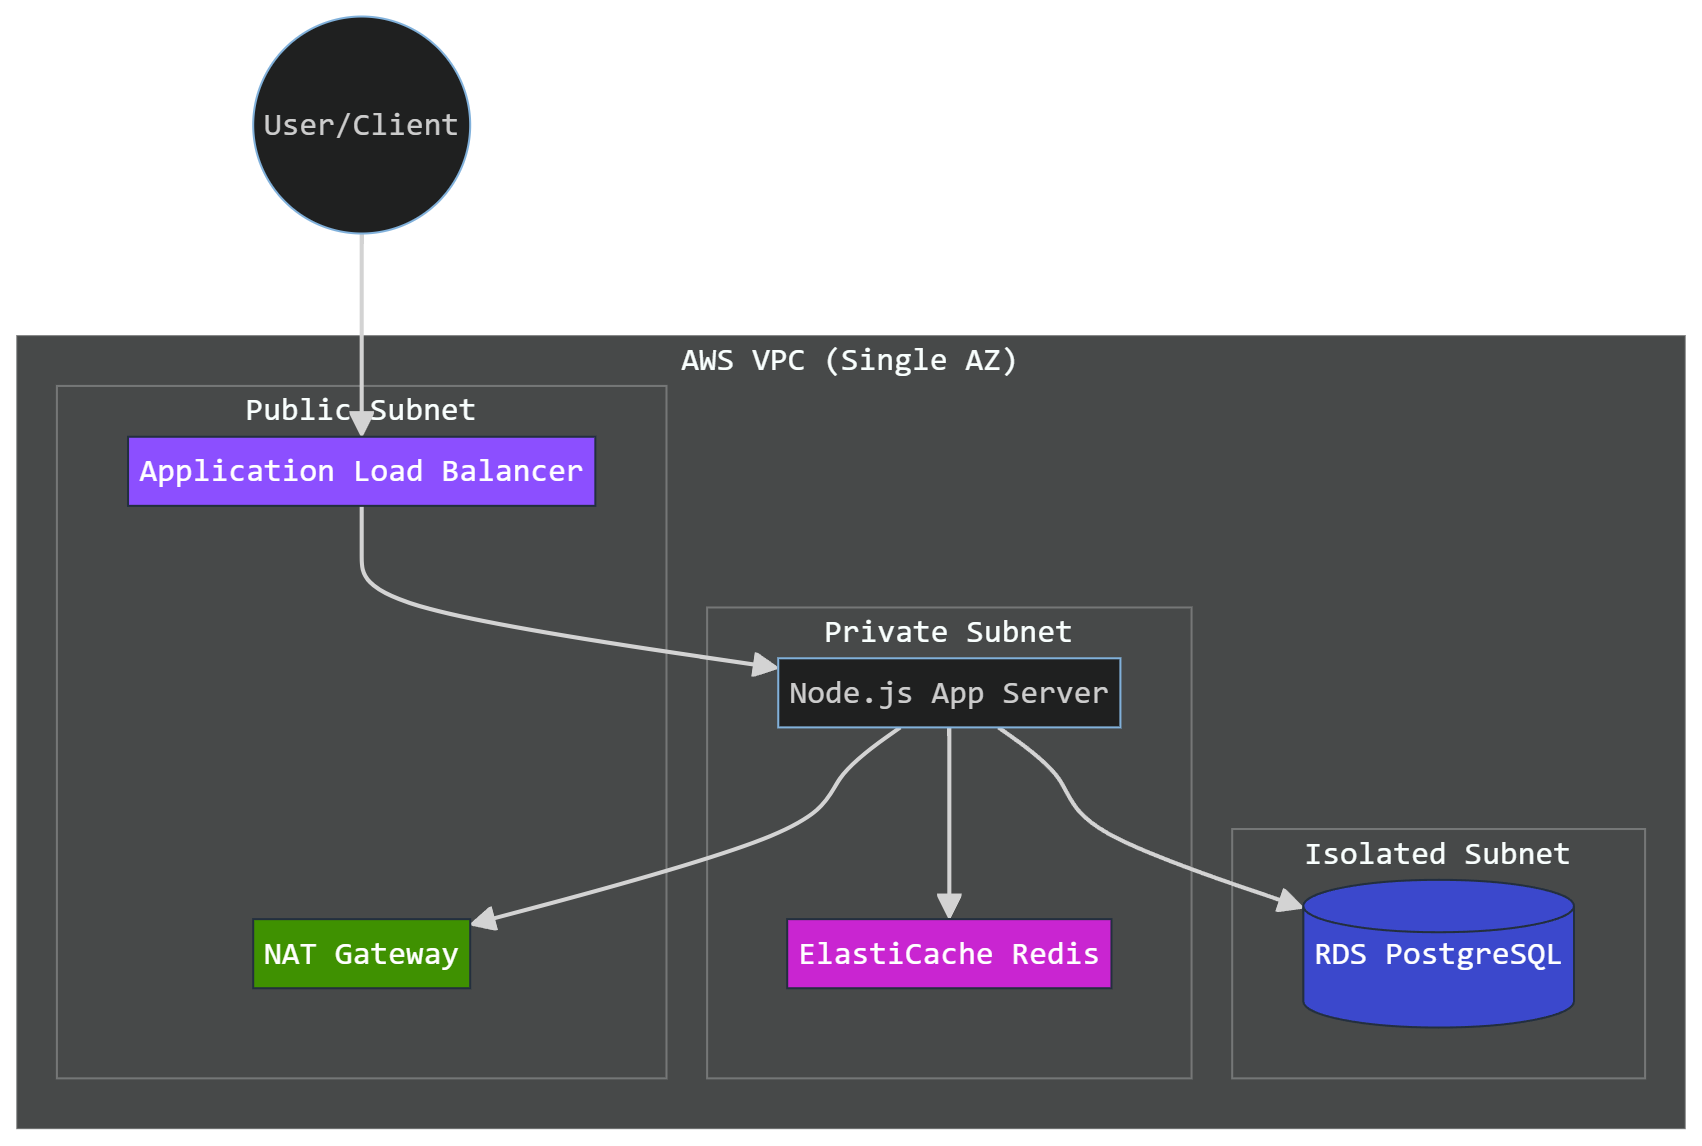
Standard Tier (Cost-Efficient)
Optimized for development and MVPs, reducing monthly costs by using single-instance resources.
Architecture Details
Network Layer (VPC / VNet)
All providers use a 3-tier network architecture:
- Public Subnets: For Load Balancers and NAT Gateways.
- Private Subnets: For Application (Node.js) instances. No direct public access.
- Isolated Subnets: For Databases. Completely air-gapped from the internet.
Security Features
- Security Groups / Firewalls: Strict "Least Privilege" rules. Database only accepts traffic from Application. Application only accepts traffic from Load Balancer.
- WAF (Production Only): Advanced protection at the edge (AWS WAF, Cloud Armor, Azure WAF) to block malicious traffic.
File Structure
When you select Terraform, a /terraform folder is created at your project root:
/terraform
├── main.tf           # Root orchestration
├── variables.tf      # Configuration variables
├── outputs.tf        # Deployment results
├── provider.tf       # Cloud Provider config (AWS/GCP/Azure)
└── modules/          # Reusable modules
    ├── vpc/          # Networking (VPC, Subnets, NAT)
    ├── security/     # WAF, Load Balancers, Firewalls
    ├── database/     # Cloud SQL / RDS / Flexible Server
    ├── compute/      # EC2 / GCE / VMSS
    └── cache/        # ElastiCache / Memorystore / Redis Cache
How to Deploy
1. Prerequisites & Authentication
Install Terraform CLI and your chosen Cloud CLI, then authenticate:
# Install AWS CLI: https://aws.amazon.com/cli/
aws configure# Install Google Cloud CLI: https://cloud.google.com/sdk/docs/install
gcloud auth application-default login
# Note: You MUST open `terraform/provider.tf` and replace `my-gcp-project-id`
# with your actual GCP Project ID before running terraform!# Install Azure CLI: https://learn.microsoft.com/en-us/cli/azure/install-azure-cli
az login2. Initialization
Navigate to the terraform folder and initialize:
cd terraform
terraform init
3. Review & Plan
Check what resources will be created. This step does not cost money:
terraform plan4. Apply
Deploy the infrastructure to your Cloud Provider:
terraform applyWARNING
Running terraform apply on a real Cloud account will incur costs. Always run terraform destroy when you are done testing to avoid unexpected charges.
Local Testing (LocalStack)
IMPORTANT
AWS Only: LocalStack is designed specifically to emulate AWS. There is no equivalent full-scale emulator for GCP or Azure VPC/Compute resources. Thus, this local testing method only works if you generated an AWS project.
WARNING
LocalStack Pro Required for Advanced Features The free Community Edition of LocalStack does not support RDS (Databases), ELBv2 (Load Balancers), or NAT Gateways. If you deploy the Production or Standard tier templates to the free version of LocalStack, you will encounter StatusCode: 501, API for service 'rds/elbv2' not yet implemented or pro feature errors. You must either have a LocalStack Pro license or test these specific resources on a real AWS account.
You can test your AWS infrastructure locally using LocalStack, allowing you to validate your Terraform configuration without spending any money on AWS.
1. Prerequisites
- Docker Desktop running.
- LocalStack CLI installed:
pip install localstack. - Terraform Local wrapper installed:
pip install terraform-local.
2. Start LocalStack
Open your terminal and run:
localstack start -d3. Deploy Locally (Using tflocal - Recommended)
To automatically redirect Terraform to your local environment without modifying code, use the tflocal command instead of terraform:
cd terraform
tflocal init
tflocal plan
tflocal apply -auto-approve
3b. Deploy Locally (Manual Override - Alternative)
If you don't want to use tflocal, you can manually override the provider settings:
- Create a
localstack.tffile inside the/terraformfolder:
provider "aws" {
  region                      = "us-east-1"
  access_key                  = "test"
  secret_key                  = "test"
  skip_credentials_validation = true
  skip_metadata_api_check     = true
  skip_requesting_account_id  = true

  endpoints {
    ec2           = "http://localhost:4566"
    rds           = "http://localhost:4566"
    elb           = "http://localhost:4566"
    elbv2         = "http://localhost:4566"
    wafv2         = "http://localhost:4566"
    iam           = "http://localhost:4566"
    sts           = "http://localhost:4566"
    elasticache   = "http://localhost:4566"
  }
}- Comment out the original
provider "aws"block in yourprovider.tf. - Run standard
terraform initandterraform apply.
IMPORTANT
Troubleshooting: AMI Lookup Failure in LocalStack If you get data.aws_ami.latest: Search returned no results during the plan or apply step, it is because LocalStack does not mock the standard "amzn2-ami-hvm-*" AMI by default.
To resolve this, open your /terraform/modules/compute/main.tf and change the AMI name filter to "*":
filter {
  name   = "name"
  values = ["*"]
}
WARNING
Remember to revert the filter back to "amzn2-ami-hvm-*" before deploying to real AWS!
GCP & Azure Testing Strategies
Unlike AWS, Google Cloud (GCP) and Microsoft Azure do not have comprehensive local emulators (like LocalStack) for core infrastructure such as VPCs, Virtual Machines, or Managed SQL Databases.
To test GCP or Azure Terraform configurations without impacting production, you should use one of the following industry-standard approaches:
1. Dry-Run (Syntax & Logic Validation)
You can validate your Terraform logic, module linkages, and syntax locally without actually creating resources.
IMPORTANT
Authentication Required: Even for a dry-run, Terraform needs to query the Cloud API. Make sure you are logged in first (gcloud auth application-default login for GCP, or az login for Azure).
cd terraform
terraform init
terraform validate  # Checks syntax and structure
terraform plan      # Simulates the deployment and shows what *would* be created
If terraform plan succeeds and lists the resources (e.g., + azurerm_virtual_network or + google_compute_network), your generated code is perfectly valid.
2. Sandbox / Dev Subscriptions (Real Deployment)
To do a full End-to-End test for GCP or Azure, the standard practice is to deploy to an isolated cloud environment:
- GCP: Create a separate "Sandbox" GCP Project. Deploy the resources, test them, and then run
terraform destroyto tear them down immediately. - Azure: Create a free-tier "Dev/Test" Subscription or a temporary Resource Group. Deploy, test, and then delete the entire Resource Group to avoid billing.
Deep Dive into Infrastructure Zero-Trust AWS Architecture
Want to understand the architecture behind this implementation? We have published two comprehensive infrastructure articles on System Weakness (Medium) regarding these exact patterns: Why Your Default VPC is a Hacker’s Playground: Designing a Zero-Trust AWS Architecture